Wednesday, August 26, 2020

Miho Municipal Forest

While hanging out laundry on a sunny afternoon, I was taken aback by the beautiful cumulonimbus clouds that were forming along the horizon. In hopes of maybe catching some shots of these clouds near a woodland or hilltop, I gathered my gear and dog together and headed out to any park that I could find where there might be a nice hilltop and as few people as possible.

I decided on a woodland park in Midori Ward in Yokohama called Miho Municipal Forest (三保市民の森). The park is available with free parking and close to a bus stop for visitors needing easy access by public transportation.

The park offers many numerous trails that are well maintained with signposts available at every junction. Once you reach deeper into the park, it became apparent that this particular park is not the best place to visit during summer due to the high population of mosquitoes. If I had not visited the park for a photo shoot, I would have made a U-turn and given up! Visiting this park would be best  between fall and spring.

Being a woodland park, I was able to catch some nice video footage of dappled sunlight just before the sun set in the west. The park also has several rest areas where visitors can relax and take in the abundance of nature. A few areas are grassy as well, so having a small picnic is also an option. 

Regarding woodland photography, I didn't scout the whole park so I cannot say if this park has much to offer in terms of a nice composition. I assume that spring would be best when there are a greater variety of flowering plants on the ground that would make for a nice foreground.  The groves of trees were beautiful as well as the groves of bamboo. Early morning photo shoots might offer some great woodland photography opportunities regardless of the season (other than summer).

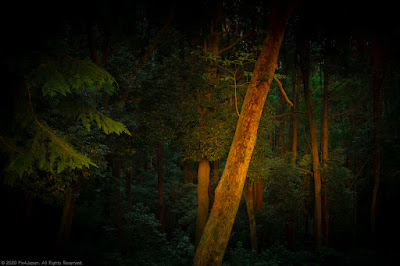
Tree Trunks at Sunset
Pentax KP 21 mm ISO 100 for 3.0 sec. at ƒ/11
#Japan #tree #woodland #forest #sunset #sunlight #dense #greenery #park #WoodlandPhotography
#神奈川県 #横浜市 #三保市民の森 #自然空間 #自然 #木 #風景 #森林 #森林写真
 

Access by car:
Access by public transportation:
A complete guide to the park is available here from the city of Yokohama. Unfortunately, there is no English version available. Even if you can't read Japanese, the guide can still be useful since it has a  nice map of all the trails with furigana so that you know how to read the signs posted in the park:

Here is the list of gear I used for this photo shoot:
*Links to Amazon are affiliated links, which means that if you choose to purchase an item that I may get a small commission that has no bearing on your purchase price whatsoever.


Creative Commons License
Pix4Japan by Iketani, Daisei is licensed under a
Creative Commons Attribution-NonCommercial-ShareAlike 4.0 International License.
Permissions beyond the scope of this license are available at Caubarrere Piché LLC.

Sunday, August 23, 2020

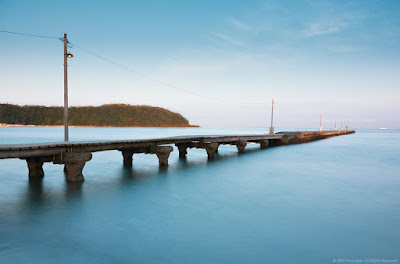
Haraoka Pier

For today's photo shoot, we visit Haraoka Beach on the shores of a small fishing village called Minamiboso, which is located on the western shoreline of Chiba Prefecture facing Tokyo Bay.

The beach is a small, quaint, and tranquil beach that features a several attractions: a small pier made partially of wood and breathtaking views of Mt. Fuji if weather conditions are just right!

The beach is a nice place to visit for seascape photography, sunbathing, swimming, fishing, or to take your date out to enjoy a romantic sunset.

As for the pier, it is one of only a handful of piers with a wooden structure that still exist in Japan. Even after the super typhoon damage the wooden parts and lights of the pier, the local community was able to make repairs and return the pier to good condition.

The  beach is also a popular sight for photographing the so-called Diamond Fuji that can be seen only twice a year--in May and and early August--when the sun sets right over the peak of Mt. Fuji. The close proximity to Tokyo has make the pier and beach attractive shooting locations for several Japanese films and dramas.

To reach this beach, I left home around 1:00 a.m. and arrived at about 4:00 a.m., almost a full hour before sunrise. Since we had the whole beach to ourselves, I let the dog out to run freely up and down the beach as she barked and chased the waves as they gently lapped the shoreline. 

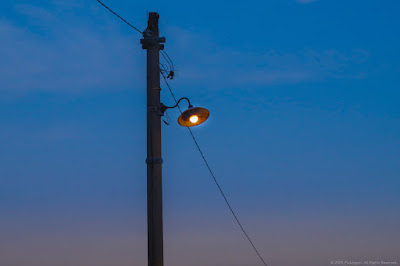
The lights on the pier and the dark blue-hour skies were a nice contrast. For this photo shoot, I simply wanted to capture the pier using an ND64 filter with a long exposure to smooth out the motion of water for an ethereal effect akin to long-exposure fine art black and white photography.

Some of the challenges I faced were deciding on a composition: A shot looking straight down the pier to the end? A shot with the village and boats in the background? A shot with the headland jutting out into the sea?

Of all the photos I took, only one had the kind of light that I thought did the scene the most justice. Plus, as the sun rose around 5:00 a.m., I had to restrain the dog and rush to capture shots of the pier as the locals started showing up for their morning walks, to go fishing on the pier, or to walk their dogs.

Small Wooden Pier on Beach in Chiba, Japan
Small Wooden Pier on Beach
Pentax KP 18 mm ISO 100 for 4.0 sec. at ƒ/10 with ND64 Filter
#Japan #beach #ToykyoBay #pier #ocean #sea #sunrise #seascape
#原岡桟橋 #原岡海水浴場 #南房総市 #千葉県 #桟橋 #砂浜 #海の景色 #海の風景

Lamppost on Pier
Lamppost on Pier
Pentax K-S2 65.5 mm ISO 1600 for 1/320 sec. at ƒ/14 (Shot in JPEG)
#Japan #beach #ToykyoBay #pier #ocean #sea #sunrise #seascape
#原岡桟橋 #原岡海水浴場 #南房総市 #千葉県 #桟橋 #砂浜 #海の景色 #海の風景

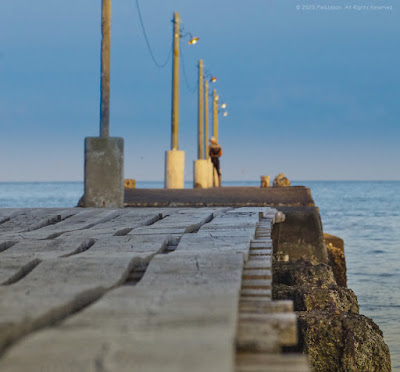
Pier Leading out to Sea
Pentax K-S2 137.5 mm ISO 1600 for 1/500 sec. at ƒ/14  (Shot in JPEG)
#Japan #beach #ToykyoBay #pier #ocean #sea #sunrise #seascape
#原岡桟橋 #原岡海水浴場 #南房総市 #千葉県 #桟橋 #砂浜 #海の景色 #海の風景

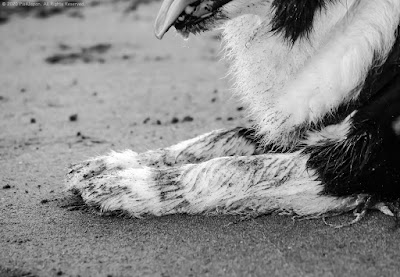
Sandy Front Paws of Border Collie
Pentax K-S2 137.5 mm ISO 1600 for 1/400 sec. at ƒ/7.1  (Shot in JPEG)
#Japan #beach #ToykyoBay #pier #ocean #sea #sunrise #seascape
#原岡桟橋 #原岡海水浴場 #南房総市 #千葉県 #桟橋 #砂浜 #海の景色 #海の風景

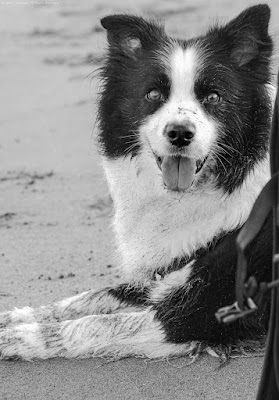
Border Collie Looking at Camera
Pentax K-S2 87.5 mm ISO 1600 for 1/400 sec. at ƒ/6.3  (Shot in JPEG)
#Japan #beach #ToykyoBay #pier #ocean #sea #sunrise #seascape
#原岡桟橋 #原岡海水浴場 #南房総市 #千葉県 #桟橋 #砂浜 #海の景色 #海の風景

Being cooped up in an office for hours on end at my day job, it’s great for my body, mind, and soul to get outside and be closer to nature whether it’s in the mountains, along a river, or on a beach.

These tiny one-day adventures also give my dog a chance to experience the world while she is still active and healthy. And if I arrive early enough, my dog and I can have a whole mountain or beach to ourselves--a blessing indeed when you live in one the world's most crowded countries!

I hope you enjoyed today’s short photo shoot and might be inspired to visit Haraoka Pier whether it’s for sightseeing, taking your dog for a walk, or for use as a great location for seascape photography.


Access from Tokyo:
  • Expressway
    • The quickest way is to reach Haraoka Beach from Tokyo is to get on the expressway, head for Kawasaki, and from there take the Aqua-Line Expressway--a long tunnel that goes deep under Tokyo Bay--to reach the opposite coastline in Chiba Prefecture.
    • This route takes about 1 hour and 20 minutes at a cost of about 6,500 yen. Actual costs will vary if you pay in cash or with an ETC card, and the size of your vehicle. If you drive a kei car (軽自動車), your rates will be a bit cheaper.
    • Sample route on Google Maps: https://goo.gl/maps/qviZFBVqeBSu9Pbf7
  • Highway
    • There are no tolls for taking a national or prefectural highway. Unlike an expressway, however, you'll end up spending a little bit more in terms of fuel economy and time due to traffic congestion and traffic lights.
    • Following national highways to the beach will take about 3 hours and 10 minutes from Tokyo.
    • Sample route on Google Maps: https://goo.gl/maps/WjfMjbREVLX27Ad17
The nice thing about visiting rural areas by car is that parking is often much cheaper than Tokyo and if your lucky, parking might be free! The parking lot for Haraoka Beach is only a 3-minute walk from the water’s edge and is available at no cost. This was a big plus for me since I had spent so much on the cost of the toll roads.
  • Train
    • The cheapest and probably most convenient way to access the beach is by train. The best  thing about traveling by train is that once you get a seat, you can take a nice long nap until you reach your destination. Not having to deal with traffic makes for an ideal, stress-free experience.
    • The  Keiyo Line and Uchibo Line offer the simplest and most direct route, which takes about 2 hours and 40 minutes at a cost of 2,310 yen. If you are a tourist and qualify for any special pass, you can travel for much cheaper.
    • Sample route on Google Maps: https://goo.gl/maps/brkT7N9PoHMrMpex7

Here is the list of gear I used for this photo shoot:
*Links to Amazon are affiliated links, which means that if you choose to purchase an item that I may get a small commission that has no bearing on your purchase price whatsoever.

Creative Commons License
Pix4Japan by Iketani, Daisei is licensed under a
Creative Commons Attribution-NonCommercial-ShareAlike 4.0 International License.
Permissions beyond the scope of this license are available at Caubarrere Piché LLC.

Tuesday, August 18, 2020

Sayama Lake

Sayama Lake, originally called Yamaguchi Lake, is a man-made reservoir that was built using an earthen dam, which  was completed in 1929. Due to a lack of heavy earth-moving equipment in Japan at that time, the dam was constructed mostly by farmers who used picks and shovels. The majority of the workers were farmers hired to do the work after the growing season had come to a close. A total of 1,720 villagers were forced to leave their homes to make way for the dam as demand for fresh water increased with a  population explosion in Tokyo. 

During WWII, the embankment of the dam was reinforced with ballistic-resistant concrete and the towers were reinforced with a bullet-proof exterior as measures against the Tokyo air raids. 

The design of the intake towers was heavily influenced by the trends of western architecture that were poplar in Japan in the early 20th century, as can be seen by the use of red bricks on the exterior, copper roofing, and artistic design elements above the doorway to the tower's interior. Although the bridge is currently painted white, early color photos from many decades ago show a bridge painted in a copper-red coat of paint, which makes it look like a miniature version of the Golden Gate Bridge in San Francisco. 

On the occasion that the reservoir is partially drained for maintenance work on the water intake towers, remnants of the villages that were submerged can still be seen.

Sayama Lake is located about 40 km (approx. 25 miles) northwest of Tokyo. It takes about 2 hours to drive there if you avoid toll roads. Luckily, the lake is easily accessible by public transportation as well. Links for access are posted at the end of this post.

My dog and I left home at around 1:00 a.m. and reached a parking lot right across the street from the lake about 90 minutes before sunrise. Across the street from the parking lot is the entrance to the park grounds that are located on the eastern side of the lake where the earthen dam is located. 

Since the reservoir is used to provide fresh water to the residents of Tokyo, the lake itself is off limits to any human activity in the water: no swimming, no boating, no fishing, etc. The hills surrounding the lake are also off limits. Except for the promenade running across the top of the dam, high fencing with several bands of barbwire encircle the rest of the hills that feed water into the lake. The lack of human access has created a small oasis of natural habitat where various species of insects, birds, mammals and flora can flourish.

Unsurprisingly, the sky and horizon were hazy during this photo shoot, as tends to be the case during summer. On clear days from autumn to spring, however (or soon after a typhoon), bird watchers and photographers can be seen on top of the dam trying to catch shots or views of various birds. During the dryer months of winter, Mt. Fuji can be seen from the dam along with its reflection on the lake water under the right conditions.

While scouting for compositions, I met many elderly people who had come out for an early morning walk, and several folks who were walking their dogs. My border collie was well behaved and didn't raise a ruckus with the other dogs. She got along well with the owners as well. I enjoyed chatting with the kind folks who visited the dam from local neighborhoods.

For this particular photo shoot, my primary aim was to capture shots of the water intake towers and the cable-stayed bridges that lead out into the water about 20 to 30 meters from the shoreline. Of the 21 shots I took, only four were good enough to publish on social media. And maybe 2 shots will be added to my portfolio. I find it incredibly difficult to objectively select a photo that might be considered a good photograph. I would love to know how other photographers "grade" or evaluate their own photos, and at what point can they honestly say that such-and-such a shot is indeed a good photograph.

I clearly have photos that I like more than others, but I am obviously biased. 

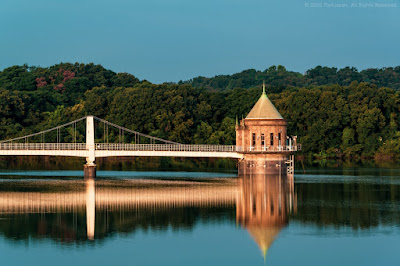
Water Intake Tower and Bridge
Pentax KP 98 mm ISO 100 for 1/25 sec. at ƒ/13
#Japan #reservoir #lake #park #freshwater #greenery #sunrise #tower #WaterIntake #scenic #landscape #summer #NaturePreserve
#狭山湖 #山口湖 #所沢市 #埼玉県 #取水塔 #西洋の雰囲気 #水道水
 
After the sun had finally rose above the horizon, the golden light lit up the water intake tower and bridge creating a beautiful reflection on the water surface. The lack of strong wind helped to ensure that the reflection was mostly smooth.

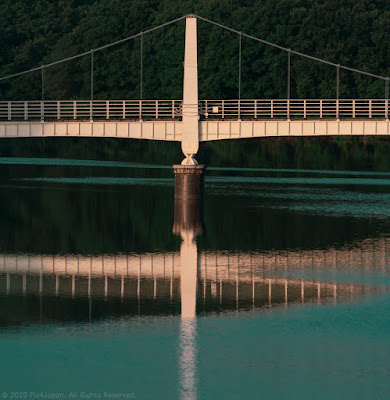
Cable-Stayed Bridge of Water Reservoir
Pentax KP 190 mm ISO 100 for 1/80 sec. at ƒ/9
#Japan #reservoir #lake #bridge #cablestayed #greenery #sunrise #reflections #scenic #landscape #summer #goldenhour
#狭山湖 #山口湖 #所沢市 #埼玉県 #斜張橋 #吊り橋 #水道水

This shot was taken in vertical mode, but I had too much dead space at the bottom. I cropped the image to make it easier to post online at various social media sites. I feel the color of the bridge appears a bit overexposed. I still lack the technical skills to raise the exposure of the water and forested hills without blowing out the white paint. This particular shot was a compromise between these two conflicting desires. I wonder if it is apparent to the casual viewer, but I was drawn drawn into this composition not because of the bridge, but rather because of the zigzag reflections that are not exactly symmetrical with the bridge. It is almost like an optical illusion to my eyes.

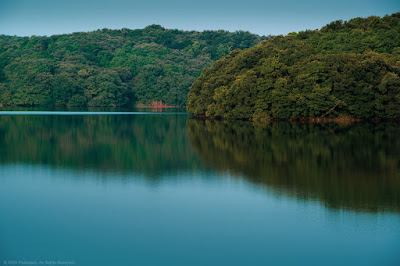
Wooded Hills and Freshwater Reservoir
Pentax KP 135 mm ISO 100 for 1/60 sec. at ƒ/10
#Japan #reservoir #woodland #forest #lake #shoreline #freshwater #lush #scenic #landscape #summer #goldenhour
#木 #森 #狭山湖 #森林地 #湖畔 #貯水池 #所沢市 #埼玉県

This is my second favorite shot after the photo of the water intake tower. The composition is very simple with very little change in the basic colors throughout the scene. That said, I like the minimalism of this shot--very simple and uncomplicated. My eye is especially drawn to the symmetry of the lush hills and their reflections, and to the slight change in hues of green between the foliage in the middleground and that of the background.

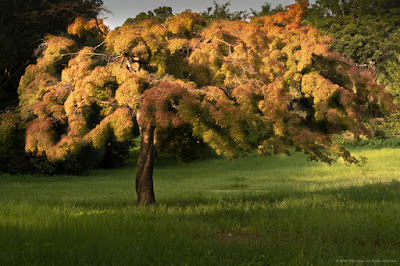
Japanese Maple Tree in Park
Pentax KP 55 mm ISO 100 for 1/60 sec. at ƒ/10
#Japan #tree #maple #leaves #park #greenery #foliage #lush #scenic #landscape #summer #goldenhour
#もみじ #木 #狭山湖 #六道山公園 #所沢市 #埼玉県

Just before leaving to go home, we walked to the far end of the dam and followed some foot trails through some nice, grassy areas of the park that is part of the dam. As I turned a corner around a huge cedar tree, this Japanese maple tree with leaves that were distinctly different from the lush, dark green foliage that surrounded the park came into my view. The morning sun cast soft, golden light on the leaves highlighting the contrast in colors with all of the other trees in the park.

Since all the photos in this shoot were shot in RAW format, some post-processing was required to bring out the tones, light, and mood that were present at the time I took the photos.

Check out the vlog post for this photo shoot on YouTube:


Access by car:
  • Google Maps link to nearest parking lot: https://goo.gl/maps/VSvzNaFfpEuufiJc8
    • Lake Sayama #2 Parking Lot (狭山湖第二駐車場)
    • Address: 1370 Kamiyamaguchi, Tokorozawa, Saitama 359-1153
    • Japanese address: 〒359-1153 埼玉県所沢市大字上山口1370
Access by train:
  • Google Maps link to nearest train station: https://goo.gl/maps/YKc3EBLuBGvRVmz9A
    • Seibukyujo-Mae Station (西武球場前駅) on the Seibu-Sayama Line which is accessible from Nishi-Tokorozawa Station on the Seibu-Ikebukuro Line.

Here is the list of gear I used for this photo shoot:
*Links to Amazon are affiliated links, which means that if you choose to purchase an item that I may get a small commission that has no bearing on your purchase price whatsoever.


ACreative Commons License
Pix4Japan by Iketani, Daisei is licensed under a
Creative Commons Attribution-NonCommercial-ShareAlike 4.0 International License.
Permissions beyond the scope of this license are available at Caubarrere Piché LLC.

Sunday, August 16, 2020

Satta-Toge Pass

Left home at around midnight and drove for about 3 hours non-stop to reach Satta-Toge Pass in Shizuoka Prefecture. I took the Tomei Expressway to reach this location and was able to arrive about 30 minutes before sunrise.

By the time I reached the outlook spot where you have the best view of Mt. Fuji, several other photographers had already shown up and had their tripods out waiting for the sun to rise.

As usual, I brought my border collie with me. Since it gets so hot so quickly, it's safer and more bearable for her if we travel at night and let her rest in the car with the A/C on as we drive back home in the morning or early afternoon.

The first shot I took was pretty straightforward. Both of the photos in this blog post were shot in RAW, so there was some post processing required. For both shots, very little editing was applied in Lightroom.

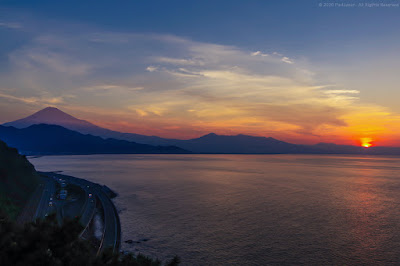
View of Mt. Fuji from Satta-Toge Pass
Mt. Fuji at Sunrise
Pentax KP 18 mm ISO 100 for 1/40 sec. at ƒ/8
#mountain #Japan #landscape #mountains #MtFuji #SurugaBay #sunrise #GoldenHour #scenic #ScenicLandscape #summer #TravelDestination #volcano
#富士山 #風景写真 #静岡県 #薩埵峠 #駿河湾 #日の出

For the first shot, exposure was increased slightly to +0.10 to bring out the features of Mt. Fuji, while the contrast was increased by +22 for the colors in the sky. To compensate for overexposure of the sun, highlights were drawn down by -41 and shadows were raised to +86. Furthermore, texture was increased to +12, clarity to +24, and dehaze to +6.

No virtual graduation filter was applied in Lightroom. Warmer hues were slightly increased, while cooler saturations were increased. 

The second shot (below) required a little bit more work because I used an ND64 (6-stop) filter with a longer exposure.

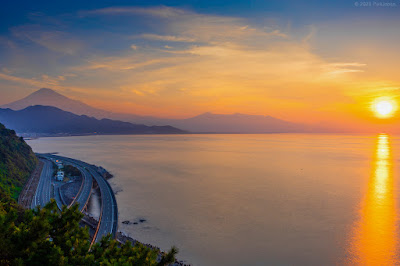
View of Mt. Fuji from Satta-Toge Pass
Mt. Fuji right after Sunrise
Pentax KP 21 mm ISO 100 for 5.0 sec. at ƒ/8
#mountain #Japan #landscape #mountains #MtFuji #SurugaBay #sunrise #GoldenHour #scenic #ScenicLandscape #summer #TravelDestination #volcano
#富士山 #風景写真 #静岡県 #薩埵峠 #駿河湾 #日の出

I applied two graduation filters in Lightroom for this shot. One from the top of the frame  down to the horizon. The second filter was from the right of the scene up to the highway on the left. This edit  gave me more definition and contrast in the upper half of the composition, and allowed me to maintain max light from the sun without overexposure, and gave me greater control for increasing exposure of the coastline without washing out the sunlight.

I am sure there must be better ways to achieve the same results with a greater amount of finesse. If  anyone reading this post has some suggestions or ideas, please leave me a comment in the section below.

Finally, here is the vlog post at Pix4Japan from this photo shoot:
"Landscape Photography in Japan: Satta Toge Pass & Tokoku-ji Temple"

Access details are available below:

Google Maps Links:

Satta-toge Pass Observation Deck

JR Okitsu Station:

Japanese address to observation deck:
〒421-3115
静岡県静岡市清水区由比西倉澤937-13

English Address:
Satta-toge Pass
937-13 Yuinishikurasawa, Shimizu Ward,
Shizuoka, 421-3115 Japan

Creative Commons License
Pix4Japan by Iketani, Daisei is licensed under a
Creative Commons Attribution-NonCommercial-ShareAlike 4.0 International License.
Permissions beyond the scope of this license are available at Caubarrere Piché LLC.

Wednesday, August 12, 2020

Mt. Oyama

今日のテーマは、神奈川県の「大山」。

撮影スポットの写真撮影しながら、カメラ・撮影技術・撮影スポットの英会話を楽しもう!

 ぜひIDCS英会話の『Pix & English』をご参考ください!

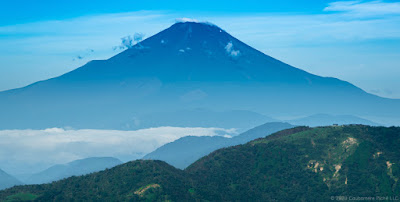
Mt. Fuji
Mt. Fuji

Mt. Oyama is located in the city of Isehara of Kanagawa Prefecture and is easily accessible from Tokyo on the Odakyu Line or via the Tomei Expressway.

There is a promenade lined with shops and restaurants between the tourist information center and the trailhead at the base of the mountain.

At the end of the promenade, you will find the trailhead and the cable car station that first stops at Oyama-dera Temple, and then continues where it terminates at Oyama Afuri Shrine Shimosha. 

The Odakyu Line runs trains, express trains, and buses from Isehara city up to the tourist information center at the base of the mountain.

Excellent source of info in English is here:

Odakyu also offers  a 1-day itinerary if you want to visit just for sightseeing without any heavy hiking gear or boots:

If you a car (private or rental), driving to the furthermost parking lot near the information center is another great option that is affordable. Parking costs only 1,000 yen for the whole day. However, the parking lot fills up quickly so you had better arrive as early as possible or try to find parking farther down from the mountain. Depending on the time of year and whether you are visiting on a weekday, during the weekend, or on a national holiday, it might be best to arrive before or near the time of sunrise.

When I arrived at the parking lot, it was around 1:30 a.m. Although I was the first person to the parking lot, by the time I left the car 20 minutes later, two more cars had already arrived!

Although there is a cable car that will take visitors up to the two main attractions holy sites of a temple and shrine, I ended up climbing all the way from the information center to the top the mountain for two reasons:

1) The cable car does not start operations until much later in the morning when summer temperatures have already started soaring making a hike to the mountain peak an extremely difficult challenge for me since I am not an experienced hiker who could easily withstand the heat, humidity, and steep slopes; and

2) Pets as large as my border collie cannot fit in the cages that are available for pets when taking the cable car. In the end, actually climbing the mountain was my only option.

Whether you visit Mt. Oyama for sightseeing or for mountain climbing, I highly recommend that you first visit the information center near the bus stop/parking lot closest to the trailhead. The center offers free foreign-language pamphlets that provide detailed histories of each attraction and useful maps on how to access all that Mt. Oyama has to offer including other attractions that are nearby.

Climbing up the mountain can be divided into 3 stages:

Stage 1

This stage begins at the tourist information center (near parking lots and bus stop) and takes you to the cable car station. At this stage there is a nicely paved promenade lined  with many shops and restaurants stretching from the information center up to the first station of the cable car.

Stage 2

This stage begins at the cable car station and includes a stop at Oyama-dera Temple and ends at Oyama Afuri Shrine Shimosha.

For stage 2, you three options for making your ascent:

Option A

Take the cable car to the first stop to visit Oyama-dera Temple, get back on the cable  car and go to the last stop to visit Oyama Afuri Shrine Shimosha.

Option B

From the trail head, which is located near the cable car station, take the Onna-Zaka trail which will lead you to Oyama-dera Temple, and continues onto Oyama Afuri Shrine Shimosha. This trail consists mostly of stone steps and winds back and forth for a more gradual climb up the mountain. The trail is well lit at night making it very easy to hike before sunrise when the temperatures are much cooler.

Option C

From the trail head, you can take the Otoko-Zaka trail, which also takes you to Oyama-dera Temple, and from there will take you to Oyama Afuri Shrine Shimosha. This trail also consists of stairs, but is much steeper and has no lighting. Other hikers I spoke to who took Otoko-Zaka were experienced hikers with lights to help them see the stairs, and were in enough physical shape to endure the  steep climb.

Stage 3

The third stage covers the span from Oyama Afuri Shrine Shimosha (lower/sub-shrine) and ends at the peak of the mountain where you can finally reach the Oyama Afuri Shrine Honsha (upper/main shrine). This stage has only 1 option to reach the peak: a heavily washed out trail that is easy at some points and arduous at others where you have to navigate over small boulders while carrying a sufficient amount of water (and camera gear in my case).

I am not an experienced hiker, so I took my time, took many breaks, and did my best to avoid having a heatstroke as the sun quickly rose causing temperatures to soar. On my way down, I came across small children and elderly people climbing well after temperatures had risen, so the climb is doable for beginners if you are prepared with proper footwear and water.

Upon reaching the  top, you can visit the primary shrine, Oyama Afuri Shrine Honsha, which houses the deity of the mountain. However, do not expect to see another grand shrine like that of the lower/sub-shrine, Oyama Afuri Shrine Shimosha. The upper shrine is the ultimate goal for a proper pilgrimage. The lower shrine is also important for a pilgrimage, but has more of a tourist site type of vibe.

Views from the peak are beautiful and depending on the weather and time of year, epic views of Mt. Fuji to the west and Shonan Bay to the east are easily visible.

However, bear in mind that climbing almost any mountain near Tokyo in August will almost always be a slight disappointment since the the snowcap on Mt. Fuji will have melted leaving with a dark, barren peak. The horizon will also be obscured by a milky haze that washes out all details of distant shores and mountain ridges. Sunrises are also washed out a bit, making it impossible to find light directly striking any nearby peaks or objects in the skyline.

Although I didn’t expect to capture any epic shots worth printing or adding to my portfolio, the experience was well worth it as I plan to visit again during a different season.

I would recommend this peak for landscape photography during autumn or spring. You will have a chance to meet other kind climbers where everyone greets each other and offers words of encouragement. Access from Tokyo is great in terms of time and cost. Even if you have no desire to climb to the top, taking the cable car to the temple and the sub-shrine is worth the visit!

Be sure to check out my vlog of this climb on YouTube:


Useful Links:

Isehara Train Station (伊勢原駅): https://goo.gl/maps/pdNBw9b7HNvM1fSB6

Oyama Information Centre (大山観光案内所): https://goo.gl/maps/5bnLx5kC2snkjtVDA

Oyama Cable Car Station (大山ケーブル駅): https://goo.gl/maps/HndNTqoxM2nK9ik57

Oyama-dera Temple (雨降山大山寺): https://goo.gl/maps/aJeSB5teaqfJGhwm9

Oyama Afuri Shrine Shimosha (大山阿夫利神社下社拝殿): https://goo.gl/maps/8XfBJaurcPjcn9Ch7

Oyama Afuri Shrine Honsha (大山阿夫利神社 本社): https://goo.gl/maps/fBVC3j5zRsWr3JWSA

Creative Commons License
Photos used with permission.
Pix4Japan by Iketani, Daisei is licensed under a
Creative Commons Attribution-NonCommercial-ShareAlike 4.0 International License.
Permissions beyond the scope of this license are available at Caubarrere Piché LLC.

Tuesday, August 4, 2020

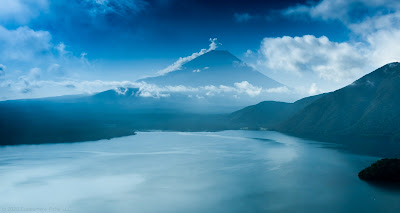
Mt. Fuji and Lake Motosu

Mt. Fuji and Lake Motosu
Pentax KP 18 mm ISO 100 for 1/400 sec. at ƒ/11
#lake #volcano #MoutFuji #MtFuji #LakeMotosu #Yamanashi #Japan
#湖 #火山 #本栖湖 #富士五湖 #富士山 #山梨県

Lake Motosu (本栖湖) is one of the Fuji Five Lakes located at the base of Mt. Fuji.  The lake is located in Yamanashi Prefecture, and is known for two things: 1)  the deepest of the Fuji Five Lakes and claims to have the clearest water compared to the other lakes; and 2) the view of the lake was photographed by Okada Koyo (1895-1972) in 1935, which was then the inspiration of the view of Mt. Fuji printed on the back of the 5,000-yen bill and the 1,000-yen bill.

When visiting the lake, the summer haze in the sky made it impossible to capture a tack-sharp composition of the lakeshore and Mt. Fuji. Landscape photography of this scene is best during autumn, winter, and spring when the air is dryer.

Access to the  lake is best if you drive due to the lack of public transportation that reaches this lake. Although it took me about 4 hours to drive through the night to reach the lake before sunrise, it is actually a two-hour drive from Tokyo if you take the expressway.

Google Maps: https://goo.gl/maps/QXMwVwbYVd2ct2oMA

Parking is free, but you had better arrive early to catch a spot!

Japanese Address: 〒409-3104 山梨県南巨摩郡身延町中ノ倉

English Address: Nakanokura, Minobu, Minamikoma District, Yamanashi 409-3104

From the parking lot near the public restrooms, you can find a trailhead that will take you on an easily accessible mountain trail that  leads to the Nakanokuratoge Observation Deck, which offers the best view of the lake and Mt. Fuji. The photo above was taken at this spot, where I was able to reach within an hour. The trail is not steep at all and is relatively smooth. The climb can  be made in sneakers if you don't have proper hiking boots.


Creative Commons License
Pix4Japan by Iketani, Daisei is licensed under a
Creative Commons Attribution-NonCommercial-ShareAlike 4.0 International License.
Permissions beyond the scope of this license are available at Caubarrere Piché LLC.